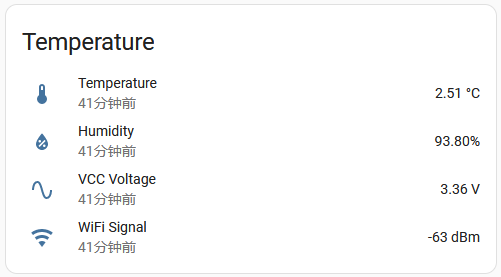
先上实物图:

至于外壳,随便找个纸盒装起来吧。
——————————————————–
目标:监测冰箱温度
选材:家里没什么智能设备,只有几个wifi插座,不想为了一个温度计而去增加zigbee或者蓝牙网关,所以做了一个wifi温度计
供电:使用两节5号电池,或者1节18650电池。直接供电,不用降压不用稳压。
难题:对电池用说,esp8266和esp32都很耗电,非常耗电,极其耗电,所以要采用深度睡眠的方式以便省电
元件:
物联网模块选择esp32还是esp8266的问题,因为esp8266可以不增加任何硬件直接测量供电电压,而esp32不行,所以选择了esp8266。这个问题的讨论: https://community.home-assistant.io/t/how-to-measure-voltage-the-chip-is-getting-on-esp32/723904
注意有些esp8266存在深度睡眠后无法唤醒的问题,上图中的就是,这个问题的讨论和解决办法:https://community.home-assistant.io/t/esp8266-how-to-wake-up-from-deep-sleep/724978
API:
这里使用mqtt而不是esphome原生api,因为网上有人说“esphome原生api不是为电池供电的设备而设计的,它建立连接速度慢”,我实测也是这样,mqtt比esphome快。这里说的是启动后首次连接api速度,不是连接wifi速度。
电路图不画了,说下接线方法:
aht20模块电源正负极接电池,SDA和SCL分别接到esp8266的SDA和SCL脚;
esp8266模块电源正负极接电池,不用降压和稳压。gpio16和rst脚直连。如果你的esp8266模块有不能唤醒的bug,可以在GPIO7(即SDD0)和电源正极之间接一个10K电阻。LED灯是模块自带的,内部接GPIO2脚。
程序设计:
为了省电,设计上设备每隔N分钟唤醒一次,唤醒后暂时不开启wifi功能,检测温度,如果温度相比于上次变化大于M度,则启动wifi,将温度上报给home assistant。
实测睡眠时耗电20uA,此阶段时长可自行设置,一般几分钟到几十分钟;唤醒不开启wifi时耗电20mA,此阶段约持续1s;连接wifi后耗电80mA,此阶段约持续3-5s。
esphome代码:
substitutions:
  name: "mqtt-temperature-esp12f-01"
  friendly_name: "MQTT_Temperature_esp12f_01"
  i2c_sda_pin: "SDA" #温度传感器引脚
  i2c_scl_pin: "SCL" #温度传感器引脚
  led_pin: "2" #LED灯引脚
  sleep_duration: "300s" #温度检测间隔时间
  temperature_change: "0.2" #温度变化多少度才联网上报温度

  #下面的设置可以不管
  project_name: "shan."
  force_connect_api_after_boot_count: "20" #唤醒多少次后强制上报数据,即使温度没有变化
  api_keep_run_duration: "1s"


esphome:
  name: ${name}
  friendly_name: ${friendly_name}
  on_boot:
    priority: 249
    then:
      - light.turn_on: status_led1

      - globals.set:
          id: my_global_boot_count
          value: !lambda return id(my_global_boot_count)+1;

      # 每启动N次,强制连接一次api
      - if:
          condition:
            lambda: return id(my_global_boot_count) > atoi("${force_connect_api_after_boot_count}");
          then:
            - globals.set:
                id: my_global_boot_count
                value: !lambda return 0;
            - globals.set:
                id: my_global_prevent_goto_sleep_when_update_ath20
                value: !lambda return true;
            - wifi.enable:

esp8266:
  board: esp12e
  restore_from_flash: true

preferences:
  flash_write_interval: 0s

# Enable logging
logger:

ota:
  password: "xxxxxxxxxxxxxxxxxxxxxx"

wifi:
  ssid: !secret wifi_ssid
  password: !secret wifi_password
  fast_connect: True
  enable_on_boot: False
  ap:
    ssid: "MQTT_Temperature_esp12f_01"
    password: ""

mqtt:
  broker: !secret mqtt_ip
  username: !secret mqtt_username
  password: !secret mqtt_password
  on_connect:
    then:
      - light.turn_on: status_led1
      - globals.set:
          id: my_global_update_count
          value: !lambda return id(my_global_update_count)+1;

      - globals.set:
          id: my_global_prevent_goto_sleep_when_update_ath20
          value: !lambda return true;

      - delay: ${api_keep_run_duration}
      - script.execute: try_goto_sleep
  on_disconnect:
    then:
      - light.turn_off: status_led1

  birth_message:
  will_message:

  on_message:
    - topic: "${name}/ota_mode"
      payload: 'ON'
      then:
        - deep_sleep.prevent: deep_sleep_1
        - globals.set:
            id: my_global_btn_status
            value: !lambda return true;
        - mqtt.publish:
            topic: "${name}/ota_mode"
            payload: ""
            retain: True

output:
  - platform: gpio
    id: led1
    pin:
      number: GPIO2
      inverted: True

light:
  - platform: status_led
    name: "Switch state"
    id: status_led1
    output: led1
    internal: True

i2c:
  sda: ${i2c_sda_pin}
  scl: ${i2c_scl_pin}
  scan: true
  id: bus_a

globals:
  - id: my_global_update_count
    type: int
    restore_value: true
    initial_value: '0'
  - id: my_global_boot_count
    type: int
    restore_value: true
    initial_value: '0'
  - id: my_global_sensor_temperature
    type: float
    restore_value: true
    initial_value: '0'
  - id: my_global_btn_status
    type: bool
    restore_value: false
    initial_value: "false"
  - id: my_global_prevent_goto_sleep_when_update_ath20
    type: bool
    restore_value: false
    initial_value: "false"

sensor:
  - platform: wifi_signal
    name: "WiFi Signal dB"
    id: sensor_wifi_signal_db
    update_interval: 1s

  - platform: adc
    pin: VCC
    name: "VCC Voltage"
    id: sensor_vcc
    # force_update: True
    update_interval: 1s

  - platform: aht10
    variant: AHT20
    id: sensor_aht20
    temperature:
      name: "AHT20 Temperature"
      on_value:
        then:
          - if:
              condition:
                lambda: return fabs(x - id(my_global_sensor_temperature)) > atof("${temperature_change}");
              then:
                # 避免在下次on_value时进入睡眠
                - globals.set:
                    id: my_global_prevent_goto_sleep_when_update_ath20
                    value: !lambda return true;
                - globals.set:
                    id: my_global_sensor_temperature
                    value: !lambda return x;
                - if:
                    condition:
                      wifi.connected:
                    then:
                    else:
                      - wifi.enable:
              else:
                - if:
                    condition:
                      lambda: return id(my_global_prevent_goto_sleep_when_update_ath20);
                    then:
                    else:
                      - script.execute: try_goto_sleep

    humidity:
      name: "AHT20 Humidity"

    update_interval: 1s

script:
  - id: try_goto_sleep
    then:
      if:
        condition:
          lambda: return id(my_global_btn_status);
        then:
          # 不睡眠
        else:
          - deep_sleep.enter: deep_sleep_1

deep_sleep:
  id: deep_sleep_1
  #允许内核运行时间
  run_duration: 60s
  #深睡眠时长
  sleep_duration: ${sleep_duration}
home assistant截图
OTA更新代码方法:
home assistant配置 – 设备与服务 – MQTT – 选项,如下图设置发送一个mqtt消息,注意将mqtt-temperature-esp12f-01改成你自己的设备name
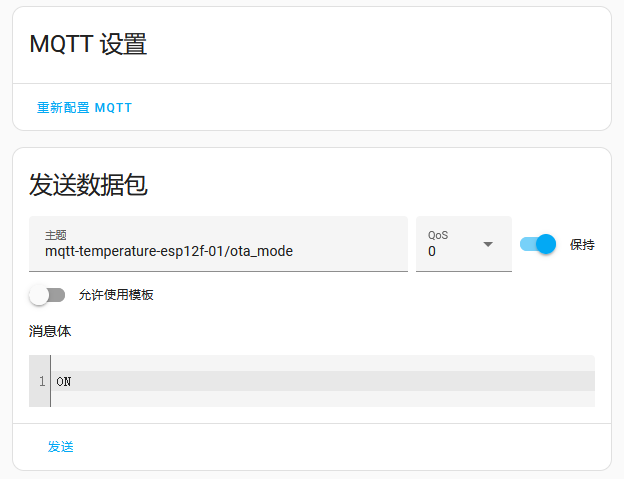
然后等待设备上线,上线后,设备会保持唤醒状态不再睡眠,就可以用常规方法通过wifi更新代码了,更新完后设备会自动重启,自动重新进入睡眠和唤醒的循环。
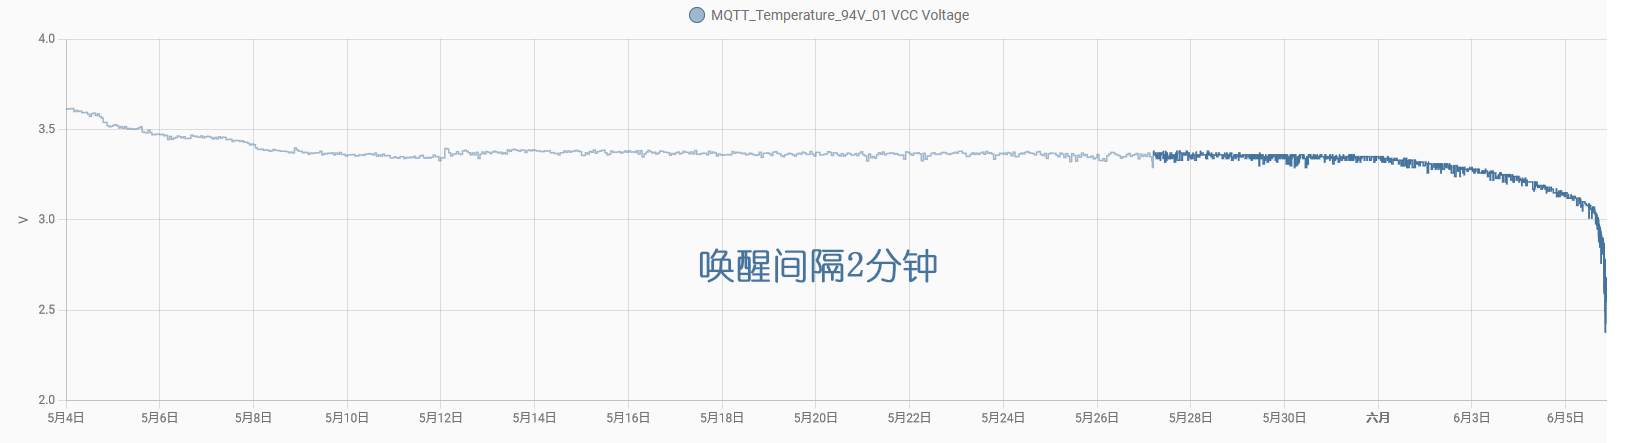
耗电情况:
为了方便测试,我设置的唤醒时间间隔是2分钟,实际使用中可以设置为10分钟、30分钟甚至1小时,这样续航会大大提升。
另外,我的是定频冰箱,冰箱内温度变化比较频繁,如果你的是变频冰箱,温度比较稳定,少开冰箱门,续航也会大大提升。
不错哦!